Frequently asked questions about spraying Anker Stuy paints
Frequently asked questions about how to prepare the substrate and how to spray Anker Stuy water based coatings. Is your question not on this page or is the answer not adequate? Then please get in touch with us for direct support.
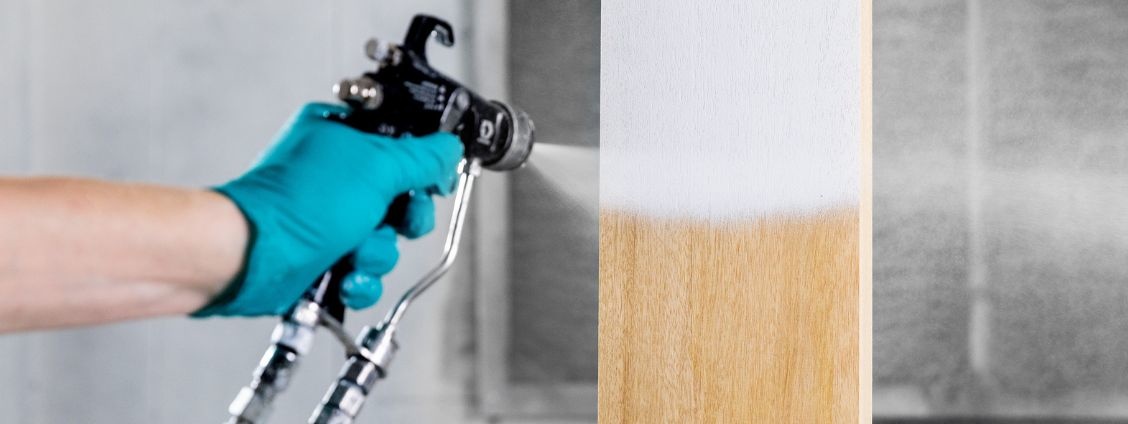
Why am I contantly getting "orange peel" on my finish?
"Orange peel" in the context of water-based wood coatings refers to a texture defect that resembles the surface of an orange. It is characterised by a dimpled or slightly bumpy appearance on the coated surface, similar to the texture of the skin of an orange. This texture defect can affect the visual appeal of the finish and may be undesirable in many wood finishing applications.
Orange peel can be caused by various factors, including:
Viscosity Issues: If the coating material is too thick or too thin, it can result in orange peel. Adjusting the viscosity of the coating material to the recommended level can help prevent this issue.
Application Technique: Applying the coating too thickly or too thinly, using the wrong type of applicator, or improper spraying techniques can contribute to orange peel.
Drying Conditions: Inadequate drying conditions, such as high humidity or low temperature, can lead to orange peel. It's important to follow the manufacturer's recommendations for drying conditions.
Surface Contamination: Contaminants on the surface, such as dust or particles, can cause orange peel. Ensure that the wood surface is clean and free of any contaminants before applying the coating.
Incompatibility of Products: Using incompatible products, such as mixing different brands or types of coatings, can lead to texture defects like orange peel.
The most common culprit of orange peel is film thickness or drying temperature.
- Using a wet film thickness gauge check your film thicknesses against the recommended levels on the technical datasheet.
- Allow for 10 to 30 minutes flash off at ambient temperature before drying with heat.
What can I do if my pump is not sucking-up paint properly?
If your spray pump is having trouble sucking up water-based paint properly, there are several potential issues that you can troubleshoot. Here are some steps you can take:
Check the Viscosity of the Paint: Check the paint's viscosity, and if needed, consider thinning with water according to the technical data sheet (TDS).
Clean the Spray Pump: Ensure that the spray pump is clean and free of any dried or clogged paint. Disassemble the pump as per the manufacturer's instructions and check the high-pressure filter and inline filter; clean any clogged parts thoroughly.
Check the Suction Tube and Filter: Make sure that the suction tube is properly inserted into the paint container and is not clogged. Many spray pumps have filters; check and clean them if necessary.
Prime the Pump: Prime the pump by following the manufacturer's instructions. This involves filling the pump with paint before starting to spray. This can help eliminate air pockets and ensure a steady flow of paint.
Check for Air Leaks: Air leaks can prevent the pump from creating the necessary suction. Inspect all connections, seals, and hoses for any signs of leaks. Tighten connections or replace parts as needed.
Adjust the Pressure Settings: Check and adjust the pressure settings on the spray pump. Low pressure might not be sufficient to draw up the paint. Consult the pump's manual for guidance on adjusting pressure.
Use the Correct Tip Size: Ensure that you are using the correct tip size for the type of paint you are spraying. Using the wrong tip can lead to issues with paint flow.
Check for Dried Paint in the Nozzle: If the nozzle is clogged with dried paint, it can impede the flow of paint. Clean the nozzle thoroughly, and if necessary, use an appropriate nozzle cleaner.
Test with Water: If you're still having issues, try testing the pump with water. This can help determine if the problem is specific to the paint or if there is a general issue with the pump.
What should I pay attention to if spraying in hot weather?
If your spray pump is having trouble sucking up water-based paint properly, there are several potential issues that you can troubleshoot. Here are some steps you can take:
- Temperature and Humidity: Monitor the ambient temperature and humidity levels. Hot weather can accelerate the drying process, potentially leading to issues such as premature drying, overspray, or uneven finish. Adjust the application parameters accordingly, Reduce temperature with air movement, avoiding pointing fans directly at drying pieces and in extremely high temperatures use our drying retardant additive (speak to the Anker Stuy team for information and prices)
Paint Consistency: In warmer temperatures, water-based paints may evaporate more quickly. Check and adjust the viscosity of the paint as needed, following the manufacturer's recommendations. This helps maintain proper atomization and application
Shade and Timing: Consider working in the shade, if your workspace has got large windows to reduce the impact of direct sunlight on the drying process. Additionally, plan your painting schedule to avoid the hottest part of the day.
Spray Gun Settings: Adjust the spray gun settings, such as pressure and fan pattern, to accommodate the faster drying time in hot weather. This helps prevent issues like orange peel or dry spray.
Avoid Overworking the Surface: In hot weather, it's crucial to avoid overworking the surface. Continuous passes over the same area can lead to uneven application and texture defects. Work efficiently and avoid unnecessary re-spraying.
Thinning the Paint: Depending on the specific conditions, you might need to thin the paint slightly to account for faster evaporation. Follow the paint manufacturer's guidelines for thinning ratios.
Drying Time: Be mindful of the reduced drying time in hot weather. This may require you to work in smaller sections to ensure that the paint is applied evenly before it dries.
Surface Preparation: Ensure that the surface to be painted is properly prepared. Hot weather can exacerbate issues such as dust and debris, so a clean and well-prepared surface is essential.
What should I pay attention to if spraying in cold weather?
Temperature: Monitor the ambient temperature closely. Cold weather can significantly affect the drying time of water-based paints. Ideally, work within the temperature range recommended by the paint manufacturer.
Paint Storage: Store the paint in a temperature-controlled environment before use. Cold paint can be thicker, and it may need time to reach the recommended viscosity. Allow the paint to acclimate to the working temperature.
Warm Up Equipment: If possible, warm up the spray equipment before use. Cold equipment can cause the paint to thicken or atomize improperly. Store the equipment in a heated space or use warming devices.
Thinning the Paint: In cold weather, water-based paints may become thicker. Adjust the paint viscosity by thinning it according to the manufacturer's recommendations. This helps maintain proper atomization and application.
Spray Gun Settings: Adjust the spray gun settings, such as pressure and fan pattern, to account for the colder conditions. This helps prevent issues like orange peel or poor coverage.
Avoid Over-spraying: In cold weather, over-spraying can lead to slower drying times and potential issues with the finish. Apply the paint in even coats and avoid excessive layering.
Dry Time: Cold weather can extend the drying time of water-based paints. Plan your work to allow sufficient drying time between coats, and avoid disturbing the painted surface during the drying process. Allow extended drying before additional coats, and prior to wrapping/installation.
Humidity Levels: Monitor humidity levels, as high humidity combined with cold temperatures can affect the drying process. Adjust your application techniques to account for these conditions.
Surface Temperature: Ensure that the surface to be painted is at an appropriate temperature. Cold surfaces can cause the paint to dry unevenly or may result in adhesion issues.
What should I not use near water-based paints to prevent contamination?
Oil-Based Products: Keep oil-based paints, solvents, and products containing oils away from water-based paints. Mixing these types of products can lead to adhesion issues, drying problems, and a compromised finish.
Dirty or Dusty Surfaces: Work in a clean environment and avoid surfaces that are dirty or dusty. Contaminants like dust and dirt can mix with the wet paint, creating imperfections in the finish.
Dirty Brushes, Rollers, or Tools: Use clean brushes, rollers, and tools specifically designated for water-based paints. Contamination from residual oil or other substances on tools can affect the paint quality.
Rags or Cloths with Residual Oil: Avoid using rags or cloths that have been used with oil-based products. Ensure that all cleaning materials are free from oils or solvents before using them with water-based paints.
Wax or Silicone-Based Products: Keep products containing wax or silicone away from water-based paints. These substances are usually found in machine/blade lubricants and can create adhesion problems and affect the paint's ability to bond with the surface.
Incompatible Primers or Sealers: Make sure that primers or sealers used on the surface are compatible with water-based paints. Using incompatible products can lead to poor adhesion and paint failure.
Previously Contaminated Tools: Ensure that any tools or equipment used in previous projects with oil-based paints are thoroughly cleaned before using them with water-based paints.
Improperly Cleaned Surfaces: If you're repainting a surface that had previously been coated with oil-based paint, make sure it's thoroughly cleaned and properly prepared before applying water-based paint.
Spray Booth Contamination: If you're using a spray booth, make sure it is clean and free from any residues of oil-based paints or other contaminants that could compromise the water-based paint job.
Chemically Reactive Substances: Avoid using substances that can react chemically with water-based paints. For example, acidic or alkaline substances can affect the paint's stability and adhesion.
Which sealant/caulk can be used in combination with our interior topcoats?
When selecting a sealant or caulk to be used in combination with Anker Stuy water-based interior topcoats, it's crucial to choose products that are compatible with water-based paints and finishes. Here are some general tips:
Acrylic Latex Caulk: Acrylic latex caulk is a common choice for use with water-based paints. It is flexible, easy to work with, and generally compatible with water-based coatings. Make sure the caulk specifically mentions compatibility with water-based paints.
Water-Based Sealants: Look for sealants that are explicitly labeled as water-based. These sealants are formulated to work well with water-based coatings and are less likely to cause issues such as adhesion problems.
Paintable Silicone Caulk: Some paintable silicone caulks are designed to be compatible with water-based paints. Check the product specifications and ensure that it is suitable for use with the specific water-based topcoat you are using.
Low VOC (Volatile Organic Compound) Caulks: Choose caulks that are low in VOC content, as these are generally more compatible with water-based paints. High VOC caulks can sometimes have solvents that may affect the paint.
Perform Compatibility Test: before applying the sealant/caulk over a large area, perform a compatibility test in a small, inconspicuous area. This helps ensure that there are no adverse reactions between the sealant and the topcoat.
Follow Anker Stuy Recommendations: We always advise Soudal Acryrub, this product has been tried and tested with our Ankocryl Interior range.
What pitfalls should be avoided for sanding waterbased interior and exterior coatings
Insufficient Surface Preparation:
- Pitfall: Failing to properly prepare the surface before sanding can result in uneven finishes and adhesion issues.
- Solution: Clean the surface thoroughly to remove dirt, dust, and contaminants. Follow the manufacturer's guidelines for surface preparation.
Inadequate Drying Time:
- Pitfall: Sanding before the water-based coating has fully dried can lead to a gummy or uneven surface.
- Solution: Allow the coating to dry completely according to the recommended drying times. Ensure proper ventilation to speed up the drying process if necessary.
Using the Wrong Grit Sandpaper:
- Pitfall: Using too coarse or too fine sandpaper can affect the finish. Coarse sandpaper may leave visible scratches, while fine sandpaper might not provide enough abrasion.
- Solution: Follow the manufacturer's recommendations for the appropriate grit size. Typically, starting with a medium grit (e.g., 120-180) and progressing to finer grits for a smoother finish is a good approach.
Over-sanding or Under-sanding:
- Pitfall: Sanding too much or too little can lead to problems. Over-sanding can remove too much material, while under-sanding may result in an insufficiently smooth surface.
- Solution: Follow a systematic sanding process, and be mindful of the amount of material being removed. Check the surface periodically to ensure it meets your desired smoothness.
Contamination from Sanding Dust:
- Pitfall: Sanding dust can settle on the surface and become trapped in the coating, leading to a rough finish.
- Solution: Wipe down the surface with a tack cloth or a damp, lint-free cloth to remove sanding dust before applying additional coats or finishes.
Using Contaminated Sanding Tools:
- Pitfall: Contaminated sanding tools, such as sandpaper with old paint residue, can transfer impurities to the water-based coating.
- Solution: Use clean and fresh sandpaper for each sanding session. Regularly inspect and replace sandpaper if it becomes clogged or contaminated.
Ignoring Safety Precautions:
- Pitfall: Neglecting safety precautions, such as using appropriate personal protective equipment (PPE) like masks and goggles, can lead to health risks.
- Solution: Always wear the necessary PPE to protect yourself from inhaling dust or particles during sanding.
Skipping Between Coats Sanding:
- Pitfall: Failing to sand between coats can result in poor adhesion between layers and compromise the durability of the finish.
- Solution: Follow the recommended sanding intervals between coats to promote proper adhesion and a smoother final finish.
We carry a good stock of Mirka abrasives, specifically chosen in order to give our users the best finish. If in doubt we recommend the use of a guide coat, available through our ancillaries offering. Get in touch with the Anker Stuy team and we will be able to recommend the most suitable sandpaper.